.
.
.
Showing posts with label raspberry. Show all posts

Frozen Berry Mousse Mini Cups


Simple, frozen mini cups delight the palate with sweetness and a little bite.
Berries and whipping cream get together for your pleasure and refreshment.


This year, we have remained put and decided to slowly visit new and old parts of our own city.
How could I not start with a visit at the old port of Montreal.

A beautiful, clear day was awaiting for Hubby and I to get re-acquainted with this part of town.
We somehow had taken it for granted and had sadly abandoned in the last few years.


Vitality, colors and fragrances always brings inspiration.
At times, although we tend to think we're creative...we need an extra nudge.

It was time I embarked on our Montreal Metro system.
Off we went onto our mini day excursion.
Hand in hand we reminisced about the various times we spent in these charming quarters.

Tourists seemed to be more informed about the festivities than we were.
That's alright, I usually feel the same when we visit their parts of the world.


We do tend to be caught up with our work and daily grind.
What's been missing is some play and adventure time.
So, why not in our own city.


This past week we had a few beautiful, sunny days.
I was longing for an ice-cream on a sugar cone.
Then, I remembered how I'm continually turned off with the latest commercial ingredients.


A warm day like this one beckoned the desire to create an easy, fresh, cold dessert.
Here's one that is surely to hit the spot.


frozen Berry Mousse 
mini cups

Makes 24

INGREDIENTS:
(American / Metric measures)

Base:
1-1/2 cup (150g) crumbled cake or crushed cookies
Optional: Keep some crumbs for decorative garnish
Berry Mousse Cream:
. 1/2 cup (125ml) of berry purée [1 cup (250ml) red berries of choice] 
. 1/4 cup (25g) granulated sugar
. 1 Tbsp. (15ml) frozen orange concentrate
. 1 cup (250ml) whipping 35% cream


PREPARATION:
Base:
1. Spoon and press down 2 Tbsp. (15ml) of crumbs throughout the bottoms of each mini cup.  Set aside.
Berry Mousse Cream:
2. In a pre-cooled, medium bowl, whip the cream.  Place this back into the refrigerator while preparing the berries.  
3. In another medium bowl, mash the berries and then pass them through a sieve to remove all seeds.  Add them back to the bowl with the orange juice and sugar.  Whisk until the sugar has dissolved.
4. Afterwards, remove the whipping cream from the fridge and gradually fold in the berry purée.  


Assembly:
5. Fill each cup with the cold mousse cream by surpassing the cup rims just a little.
6. Place the pans in the freezer for at least 2-3 hours before carefully unmolding.  
. Serve immediately or store them unmolded into a plastic freezer container by adding parchment sheets in between the levels.  Enjoy these wonderful treats.


Here's to a continued pleasant summer wherever you are.

If you're staying on the homeland, why not  become a tourist in your own city.
You'll find that so much has indeed changed, however, the familiarity hugs you with comfort.


Ciao for now and flavourful wishes,
Foodessa


Comments ... ??? ... or suggestions ... write me :o)
Claudia at:  foodessa [at] gmail [dot] com

 
Go HERE for more SWEET creations.


Please take note on how I bake and cook...
Here’s a 101 of sorts to make sure that there are no disappointments when trying my creations.  
Also...just so you know...feel free to increase the salt and sweet factor since I'm not high on either of them ;o)
. Use DRY cup measurements for...you guessed it...all DRY ingredients.
Anything DRY gets measured by spooning the overfilled ingredient (never shake the cup) and then level off with a flat edged tool.  Exception...Brown sugar should be packed in and leveled.
. Use LIQUID cup measurements for...all LIQUIDS that cannot be leveled like for example butter, yogurt...etc.  Measure the liquids at eye level to avoid overdoing what the recipe truly needs.
. OVENS are unfortunately not created equal.  Mine is so old that it has reached many degrees off it's norm.  It's really worth investing a few dollars to test yours with an appropriate oven thermometer.  You'd be surprised how many ovens I've heard about not being where they should have been.  Before you lose any more ingredients and much time preparing a new recipe...run to the store...you'll thank me later. 


Here are a few more related recipes:
- CHOCOLATE frozen MOUSSE _ 3 Ingredients only!
- Chocolate Peanut Butter Dulce de Leche frozen pie no bake  
- LEMON mousse frozen PIE no bake 
- strawBERRY cold MOUSSE and frozen SORBET
- twirl MANGO mousse SORBET chill    
- rustic semifreddo Bomba ZUCCOTTO di Pasqua 

Fool twice BERRY light COOL delights


Sharing two of my favourite guiltless COOL pleasures.


Some creative ingredients were used to establish these deliciously light BERRY desserts.


Last year at about this time I had written about my...

Thankfully, this year has been slightly more fruitful.
However, once more, not yet to my satisfaction.

I still didn't get the chance to pick them myself.
It rained incredibly the day I planned my outing.
Was I getting one more message ?!?

The hoped for fragrance from the sweet and freshest ever... 
"June-bearing" strawberry field of 'Joelle' did not happen again!

I had to sadly once more satisfy myself with someone else's pickings.


Before sharing some recipes with berries...
here are a few factoids that may or may not surprise you about the strawberry:

Although, I'll never get used calling the strawberry anything but a fruit...
it has come to my attention that most of us have been misled by it's given berry name.
So, if it's not a fruit...then what is it?
Apparently...it's a flower!?! 
'Fragaria' from the Rosaceae plant found within the ROSE family...
hold the edible part which we commonly know as the berry fruit. 
"The pulpy flesh of a strawberry is its flower base that has swollen with juice...
forming a cushion that protects its numerous ovaries, which nestle all over the surface, appearing as seeds." 
ref.: The Science of Good Food...by D. Joachim

This powerhouse of nutrition also comes in over 600 varieties.
An average strawberry can have up to 200 seeds.

It certainly packs loads of vitamin C, manganese and anti-inflammatory phytonutrients...
however, recently there’s been newly revealed findings.

Here's directing you to consuming more of these luscious berries:
Researchers at the Salk Institute for Biological Studies have discovered that strawberries have multiple health benefits similar to blueberries and red wine thanks to a naturally occurring flavonoid called fisetin. 

They figured that...
eating about 37 average sized strawberries a day will keep most doctors away.


Also, if ever the desire to pamper yourself in strawberry style...
go ahead and bathe in 22 pounds (10 kilos) of mashed strawberries.
You will undoubtedly realize softer skin...
just as some wealthy social figures did during the French Revolution.

Now, tell me...
did you need any other excuse to eat strawberries?
***

Here are two of my favourite versatile Berry easy cool desserts.

BERRY yogurt lemon Maple syrup
Tiramisu-style PARFAIT
makes 4 parfait cups

No need for mascarpone or Ricotta with this very tasty cold dessert.
Healthy, plain yogurt did the trick and...no guilt in sight ;o)


Click HERE for a PRINTER version


INGREDIENTS:
(American / Metric measures)

...Cream
. 12 individual berries (for garnish)
. 1/2 cup (125ml) berries (for mashing) 
mashed and passed through sieve (optional)
 . 1/8 cup (30ml) maple syrup
. 1 cup (250ml) plain, yogurt, strained (2% fat or more)

...Liquid for dipping
. 1/8 cup (30ml) lemon juice
. 1/8 cup (30ml) water
. 1/8 cup (30ml) maple syrup

. 36 cookies: Italian 'Savoiardi' *
(32 for the parfait and the remaining 4 to split and use as decor) 


* Cookies -- Biscuits / Ladyfingers / 'Pavesini' / 'Savoiardi': 
Make sure the cookies are fresh...otherwise your tiramisu-parfait will undoubtedly end up too 'soppy'.  You'll also end up short with the dipping liquid.

VARIATIONS:
. The lemon juice can be replaced with 'LIMONCELLO' liquor. 
. The cream mix can be replaced by lemon or vanilla pudding...as well as custard.
. Any berry can be used in this parfait.  Also note: properly thawed, frozen berries can also be used for this recipe without a huge difference in the outcome.


PREPARATION:
...Cream:
1. Before hand, if not using a very thick yogurt, it is suggested that you strain it through a cheesecloth/sieve method in order to have it rid of its liquid (whey).  This usually takes 2 hrs.
2. Afterwards...in a medium bowl, combine the allocated berries and mash together with the maple syrup.  Remember to keep a little bit of the remaining bright coloured juice left over from the berries into a small dipping glass.  This juice will be used to color the cookie garnish.   Now, add and combine the strained yogurt with the mashed berries.  Set aside.
Note: If using berries which have seeds that happen to be 'peskier' than usual...go ahead and pass them through a fine sieve after mashing them.  
...Liquid for dipping:
3. In another medium bowl, combine the remaining liquids: lemon juice, water and maple syrup.  Set aside.
...Assembly:
4. Split all cookies in two.  Set aside and don't forget to keep two pieces from a split cookie for the garnish.
5. Prepare four parfait cups, bowls or even Martini glasses.  Place two pieces of 'dipped' cookies from the liquid towards the bottom.
6. Follow the cookies by placing a generous dollop of cream at the bottom of each cup.
7. Now, place six split pieces vertically around the perimeter of the containers.  Repeat for all containers before covering with cream.
8. Garnish with two split cookie pieces that were halfway 'dipped' into the reserved fruit liquid and place each one vertically into the cup.  
. Finish off each cup with three full berries.  Enjoy your very delicious and guilt-free dessert delight ;o)


***
As for this other very easy smooth mousse...
only 3 ingredients required for this blissful flurry treat.
Ripe BERRIES...a touch of SWEETENER...a pre-frozen EGG WHITE is all there is to it.

strawBERRY cold MOUSSE 
as well as a ’soft-serve’ 
frozen SORBET

serves 4-6


Click HERE for a PRINTER version


INGREDIENTS:
(American / Metric measures)

. 6 cups (750ml) strawberries, hulled  
. 1/4 cup (52g) superfine fruit sugar (a.k.a. fructose) 
. 1 large egg white, pre-frozen


Notes:
Sweetener alternatives:  You can use 'caster' sugar,  ‘Agave syrup' or 'Maple syrup’ also.
You may have to adjust according to your personal preference.  Just keep in mind that the preparation gets sweeter as it freezes.

Egg white: 
In order to avoid any forming bacteria, it is best to pre-freeze the egg white in a small glass container and thaw it slightly right before adding it into the fruit mix.


PREPARATION:
For a complete, pictorial instruction...
refer to the Mango Mousse I shared with you the other day

1. Hull the fresh strawberries and place onto a flat surface and freeze for about two hours or until hardened.  Note: This could have also been prepared ahead of time...pre-frozen and placed into an airtight freezer bag.

...Food processing the fruit: 
2. Place the frozen berries into the container and let stand for 30 minutes before processing.  Afterwards, purée the strawberries until chunks are no longer visible.  Keep the blade circulating on medium-high speed and gradually pour in the sweetener.  Once that has whirled into the fruit, add the pre-frozen and slightly thawed egg white that was initially placed in a small glass container. 

...Serving:
. Serve right away as a lusciously smooth mousse and/or freeze in two medium freezer containers in order for the mix to turn into its 'Sorbet' state which will take about two hours to achieve.  Enjoy.


Let's hope you get a chance to enjoy your summer with at least trying...
one of these delightfully tasty and almost guilt-free refreshing treats.

This coming July 1st, I'd like to wish you...
Happy Canada Day.

To my American friends, the same wishes come your way for a great... 
July 4th celebration.


Enjoy and stay safe.

Until next week...
flavourful wishes,
Foodessa


Comments or suggestions ... write me :o)
Claudia at: foodessa [at] gmail [dot] com

Go HERE for more SWEET creations.


Please take note on how I bake and cook...
Here’s a 101 of sorts to make sure that there are no disappointments when trying my creations.  
Also...just so you know...feel free to increase the salt and sweet factor since I'm not high on either of them ;o)
. Use DRY cup measurements for...you guessed it...all DRY ingredients.
Anything DRY gets measured by spooning the overfilled ingredient (never shake the cup) and then level off with a flat edged tool.  Exception...Brown sugar should be packed in and leveled.
. Use LIQUID cup measurements for...all LIQUIDS that cannot be leveled like for example butter, yogurt...etc.  Measure the liquids at eye level to avoid overdoing what the recipe truly needs.
. OVENS are unfortunately not created equal.  Mine is so old that it has reached many degrees off it's norm.  It's really worth investing a few dollars to test yours with an appropriate oven thermometer.  You'd be surprised how many ovens I've heard about not being where they should have been.  Before you lose any more ingredients and much time preparing a new recipe...run to the store...you'll thank me later. 


Other refreshing desserts that may be of some interest:
- twirl MANGO mousse SORBET chill    
- LEMON coconut ginger MOUSSE GELATO

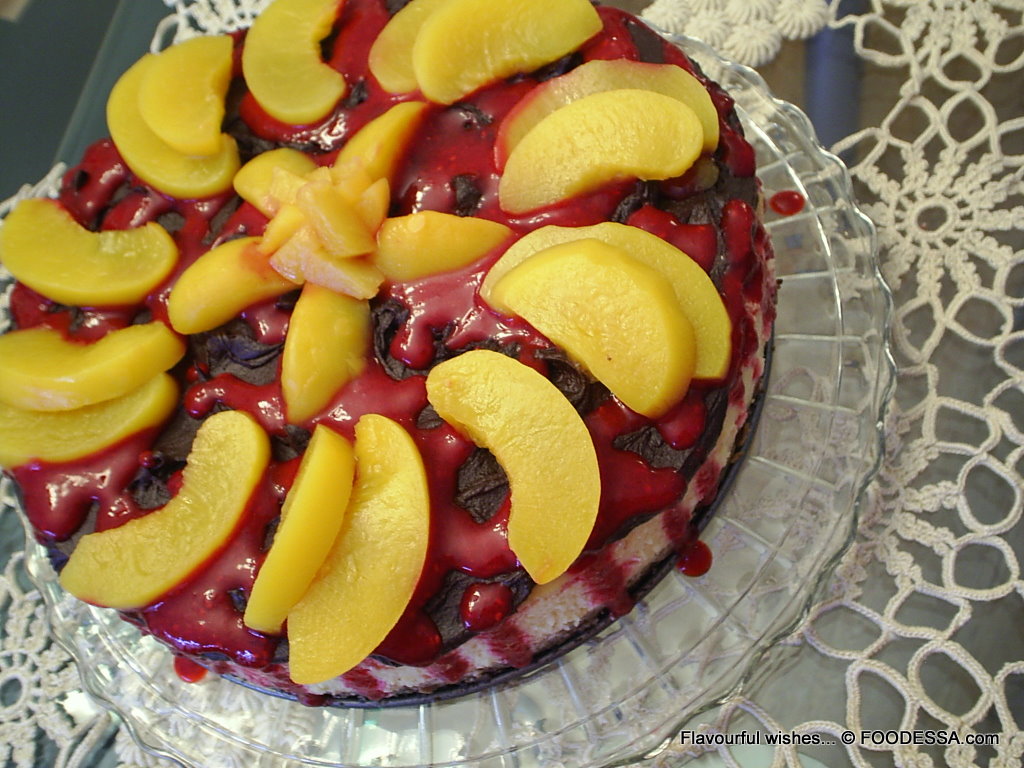
Chocolate Raspberry Peach CHEESECAKE


Over-baked cookies got recycled into the foundation for this...
deliciously indulgent classic 'New York style' creamy Cheesecake.


A draped Chocolate 'Ganache' gave into pockets lulling a Raspberry ‘coulis‘.
Sweet 'Mediterranean' Peaches capped the ceiling of this decadent cheesecake.

***
My young culinary journey through cheesecake baking has...
prompted a few questions from my close family and friends.

Every time someone has a bite of my go-to cheesecake...
they mostly tell me that their cheesecake is either:
not as tasty, not as creamy or mostly it's too much trouble to make.
I always say, nonsense! 
Then, I go on to tell them to please give this very easy cheesecake a try.


Through the years, I have often created several types of cheesecakes.
Many variants of the unusual selections like this ethnic inspired cheesecake
have been enjoyed on several delightfully delicious occasions ;o)

***
Today, I'll share with you a recipe for a smooth velvety cheesecake which was...
initially revealed to me by head chef Elizabeth Baird from the Canadian Living magazine.

For those who are familiar with my way in the kitchen...
you may know by now that over time...
I have tweaked it and laced it with my personality ;o)

Therefore, once more, I'll share one of the desserts...
which graced our New Years day sweets table.


It got polished before you could say:
Chocolate Berry Peach Classic CHEESECAKE ;o)

***

The next small section is for those...
who are still shying away from this precious, sumptuous cake.
For those who have become pros at making luscious cheesecake...
you may skip this segment and take a hop and meet me at the recipe section ;o)


What makes a lusciously decadent and satisfying cheesecake?
The ingredients and their balanced quantity certainly play a major role.


First...the recycling joy I got out of my accidentally over-baked cookies.
Since, there was no way I was offering this dryer cookie batch as one of the holiday's sweets...
I quickly thought of crushing them and stored them into the freezer.
I consoled myself by thinking that I would soon eventually put the crumbs to good use.
The over-baked cookies conveniently served for...
an incredible crust foundation to a velvety smooth cheesecake.
 
However, through experience, I'll say it most definitely...
is the method used that will offer the best results.


WHIP it good.

One of the pay offs for properly whipping the cream cheese and sweetener...
will go a long way to resulting in that velvety smooth cheesecake morsel.


Do not rush the EGGS.

Add eggs one at the time
with beater on the low setting.


Give it a BATH.

Although, not absolutely necessary...
this cake loves the spa treatment.


It will lead you to an evenly smooth and flawless surfaced cheesecake.


Chocolate Raspberry Peach CHEESECAKE  
velvety-smooth Classic ' New York style'
serves 8-10 persons
Inspired by head chef: Elizabeth Baird from the Canadian Living magazine

 Click HERE for a PRINTER recipe version


INGREDIENTS:
(American / Metric measures)
CRUST: 
. 1-1/2 cups (I35g) cake or cookie crumbs
. 1/8 cup (10g) unsweetened coconut, shredded
. 1/4 cup (60ml) unsalted butter (melted)

FILLING:
 
. 3 pkg. x (8oz./250g) Cream cheese (softened 2hrs.)
. 1 cup (220g) granulated sugar
. 4 xLarge eggs
. 1 Tbsp. (15ml) lemon juice
. 1 Tbsp. (15ml) pure Vanilla extract
. pinch of sea salt
. 1 cup (250ml) Sour cream *


 . Heavy-duty WIDE aluminium foil for a ‘water bath’ pan (optional)
* Sour cream: It is suggested to use this cream in order for the cake to be more resilient to freezing possibilities.

Topping: (Chocolate 'Ganache'spread and garnish)
. 5 oz. (l50g) bittersweet 65-70% chocolate (coarsely chopped)
. 1/8 cup (30ml) milk
. 1/8 cup (30ml) Maple syrup
. 1/2 tsp. (2.5ml) unsalted butter
. 1/2 cup (60ml) frozen raspberries for 'coulis'
. 1 can x 14oz. (398ml) canned peaches
. 1/8 cup (30ml) syrup (from peaches)


PREPARATION:
9 inch (23cm /2.5 Litre) spring form pan.
. Pre-heat oven to 350F/180C/Gas 4...place oven rack in the center.
. Note: oven will be lowered later!
. With a little vegetable oil...grease the whole cake pan.
Optional: place a round piece of parchment in order to protect the bottom of the pan when cutting and serving.
Optional...
Preparing the 'WATER BATH' (Bain Marie) to leak proof your pan:  
Foil wrap the spring form pan.  Cut out an 18 inch (46cm) square piece.  
Raise it on the sides and then crush the foil at the top as it surpasses the edges a bit.  
Note: If foil is not heavy duty...double wrap just to ensure a tight leak-proof bake.  
Another way: Cut eight even pieces of regular aluminium sheets flatly over-lapped like a star shape that will be long enough to be raise and slightly surpass the side edges of the pan.

...CRUST:
1. In a bowl, toss the crumbs and the coconut with the melted butter until a moistness is realized. Press evenly at the bottom of the pan. BAKE for about 10-12 minutes or until firm to the touch. Cool completely at room temperature. Set aside. LOWER the oven temperature to 325F/160C/Gas3.
...FILLING:
2. In a large bowl, beat the cheese with the sugar on MEDIUM speed. Combine until smooth. Gradually add the eggs one at the time while beating on very low.  Add the vanilla extract, lemon juice and sour cream.  Slowly beat until smoothly combined. Don't over beat.  Pour the batter into the prepared crust. 
...BAKE:
3. Note: If using a' Water Bath' method...add the foiled cake pan and fill the roasting pan of hot tap water by bringing it halfway up the sides of the pan. However, if not using a 'water bath'...make sure to at least place the cake pan onto a baking sheet.  BAKE for 90 minutes. 
4. With the OVEN turned OFF: Leave everything alone for 1 more hour.  Afterwards, open the oven door slightly ajar to let the rest of the heat and steam escape. Later, when oven is no longer warm (about 1 hour)...transfer cake pan to a wire rack. Once it's completely cooled, cover with plastic wrap and place it into the refrigerator. It will be ready to decorate in about 4 hours or longer.
...ASSEMBLY:
5. Place the cake pan on a serving dish. Run a wet thin metal spatula or knife around the sides of the pan and then loosen the spring form clip to release the cake. This cheesecake should be eaten in the next few days or properly plastic and foil wrapped for freezing up to one month.
 
...TOPPINGS:
6. CHOCOLATE 'ganache' spread:
In a small-medium bowl pour the milk and the coarsely chopped chocolate and milk together. Place bowl in a bain-Marie and slowly melt the chocolate while stirring once and a while til smooth.  Add the butter and syrup. Stir and set it aside until cooled enough, yet spreadable.
7. RASPBERRY 'coulis': In a blender, puree together the reserved peach syrup and raspberries. Set aside.
8. PEACHES: Drain and slice the fruit in thick pieces and set aside.
...DECORATION:
9. Pour and spread the chocolate 'ganache' throughout the surface of the cake.
10. Through a thin sieve...puree the raspberries and pour over the cake while having it slightly drape over the sides.
11. Quickly decorate the complete surface with sliced peaches before the chocolate sets and hardens.
. The covered fruit topping will remain looking fresh for at least 2 days.

***
If you’re one of those cheesecake foodies like myself...
you’ll never be disappointed with this simple, yet showy dessert.
The results are hard to beat for such an indulgence...
that turns out splendidly without too much effort.

Flavourful wishes,
Foodessa

Comments or suggestions ... write me :o)
Claudia at: foodessa [at] gmail [dot] com


Go HERE for more SWEET creations.

Please take note on how I bake and cook...
Here’s a 101 of sorts to make sure that there are no disappointments when trying my creations.  
Also...just so you know...feel free to increase the salt and sweet factor since I'm not high on either of them ;o)
. Use DRY cup measurements for...you guessed it...all DRY ingredients.
Anything DRY gets measured by spooning the overfilled ingredient (never shake the cup) and then level off with a flat edged tool.  Exception...Brown sugar should be packed in and leveled.
. Use LIQUID cup measurements for...all LIQUIDS that cannot be leveled like for example butter, yogurt...etc.  Measure the liquids at eye level to avoid overdoing what the recipe truly needs.
. OVENS are unfortunately not created equal.  Mine is so old that it has reached many degrees off it's norm.  It's really worth investing a few dollars to test yours with an appropriate oven thermometer.  You'd be surprised how many ovens I've heard about not being where they should have been.  Before you lose any more ingredients and much time preparing a new recipe...run to the store...you'll thank me later. 

Other related desserts that may inspire you: