
Over-baked cookies got recycled into the foundation for this...
deliciously indulgent classic 'New York style' creamy Cheesecake.

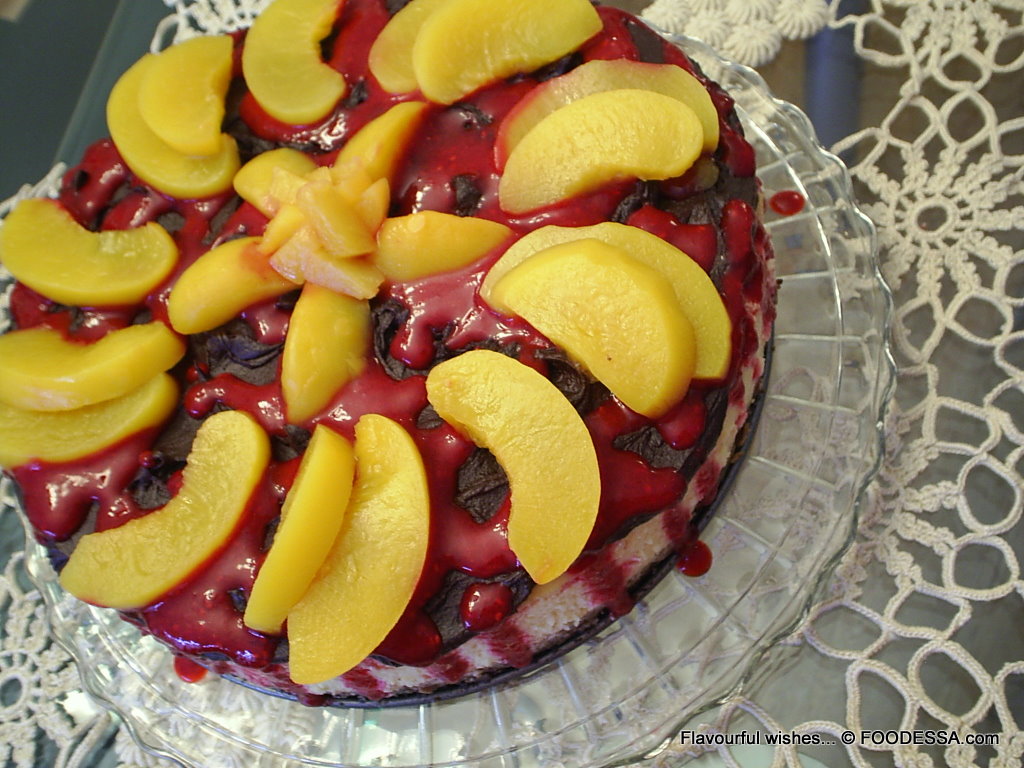
A draped Chocolate 'Ganache' gave into pockets lulling a Raspberry ‘coulis‘.
Sweet 'Mediterranean' Peaches capped the ceiling of this decadent cheesecake.
***
My young culinary journey through cheesecake baking has...
prompted a few questions from my close family and friends.
Every time someone has a bite of my go-to cheesecake...
they mostly tell me that their cheesecake is either:
not as tasty, not as creamy or mostly it's too much trouble to make.
I always say, nonsense!
Then, I go on to tell them to please give this very easy cheesecake a try.

Then, I go on to tell them to please give this very easy cheesecake a try.

Through the years, I have often created several types of cheesecakes.
Many variants of the unusual selections like this ethnic inspired cheesecake
have been enjoyed on several delightfully delicious occasions ;o)
***
Today, I'll share with you a recipe for a smooth velvety cheesecake which was...
initially revealed to me by head chef Elizabeth Baird from the Canadian Living magazine.
For those who are familiar with my way in the kitchen...
you may know by now that over time...
I have tweaked it and laced it with my personality ;o)
I have tweaked it and laced it with my personality ;o)
Therefore, once more, I'll share one of the desserts...
which graced our New Years day sweets table.

It got polished before you could say:
Chocolate Berry Peach Classic CHEESECAKE ;o)
***
The next small section is for those...
who are still shying away from this precious, sumptuous cake.
For those who have become pros at making luscious cheesecake...
you may skip this segment and take a hop and meet me at the recipe section ;o)

What makes a lusciously decadent and satisfying cheesecake?
The ingredients and their balanced quantity certainly play a major role.

First...the recycling joy I got out of my accidentally over-baked cookies.
Since, there was no way I was offering this dryer cookie batch as one of the holiday's sweets...
I quickly thought of crushing them and stored them into the freezer.
I consoled myself by thinking that I would soon eventually put the crumbs to good use.
The over-baked cookies conveniently served for...
an incredible crust foundation to a velvety smooth cheesecake.
However, through experience, I'll say it most definitely...
is the method used that will offer the best results.


WHIP it good.
One of the pay offs for properly whipping the cream cheese and sweetener...
will go a long way to resulting in that velvety smooth cheesecake morsel.

Do not rush the EGGS.
Add eggs one at the time
with beater on the low setting.
with beater on the low setting.

Give it a BATH.
Although, not absolutely necessary...
this cake loves the spa treatment.
It will lead you to an evenly smooth and flawless surfaced cheesecake.

Chocolate Raspberry Peach CHEESECAKE
velvety-smooth Classic ' New York style'
serves 8-10 persons
velvety-smooth Classic ' New York style'
serves 8-10 persons
Inspired by head chef: Elizabeth Baird from the Canadian Living magazine
Click HERE for a PRINTER recipe version
 INGREDIENTS:
Click HERE for a PRINTER recipe version

(American / Metric measures)
CRUST:
. 1-1/2 cups (I35g) cake or cookie crumbs
. 1/8 cup (10g) unsweetened coconut, shredded
. 1/4 cup (60ml) unsalted butter (melted)
FILLING:
. 3 pkg. x (8oz./250g) Cream cheese (softened 2hrs.)
. 1 cup (220g) granulated sugar
. 4 xLarge eggs
. 1 Tbsp. (15ml) lemon juice
. 1 Tbsp. (15ml) pure Vanilla extract
. pinch of sea salt
. 1 cup (250ml) Sour cream *
. Heavy-duty WIDE aluminium foil for a ‘water bath’ pan (optional)
* Sour cream: It is suggested to use this cream in order for the cake to be more resilient to freezing possibilities.
Topping: (Chocolate 'Ganache'spread and garnish)
. 5 oz. (l50g) bittersweet 65-70% chocolate (coarsely chopped)
. 1/8 cup (30ml) milk
. 1/8 cup (30ml) Maple syrup
. 1/2 tsp. (2.5ml) unsalted butter
. 1/2 cup (60ml) frozen raspberries for 'coulis'
. 1 can x 14oz. (398ml) canned peaches
. 1/8 cup (30ml) syrup (from peaches)
. 5 oz. (l50g) bittersweet 65-70% chocolate (coarsely chopped)
. 1/8 cup (30ml) milk
. 1/8 cup (30ml) Maple syrup
. 1/2 tsp. (2.5ml) unsalted butter
. 1/2 cup (60ml) frozen raspberries for 'coulis'
. 1 can x 14oz. (398ml) canned peaches
. 1/8 cup (30ml) syrup (from peaches)
PREPARATION:
9 inch (23cm /2.5 Litre) spring form pan.
. Pre-heat oven to 350F/180C/Gas 4...place oven rack in the center.
. Note: oven will be lowered later!
. With a little vegetable oil...grease the whole cake pan.
Optional: place a round piece of parchment in order to protect the bottom of the pan when cutting and serving.
. Pre-heat oven to 350F/180C/Gas 4...place oven rack in the center.
. Note: oven will be lowered later!
. With a little vegetable oil...grease the whole cake pan.
Optional: place a round piece of parchment in order to protect the bottom of the pan when cutting and serving.
Optional...
Preparing the 'WATER BATH' (Bain Marie) to leak proof your pan:
Foil wrap the spring form pan. Cut out an 18 inch (46cm) square piece.
Raise it on the sides and then crush the foil at the top as it surpasses the edges a bit.
Note: If foil is not heavy duty...double wrap just to ensure a tight leak-proof bake.
Another way: Cut eight even pieces of regular aluminium sheets flatly over-lapped like a star shape that will be long enough to be raise and slightly surpass the side edges of the pan.

...CRUST:
1. In a bowl, toss the crumbs and the coconut with the melted butter until a moistness is realized. Press evenly at the bottom of the pan. BAKE for about 10-12 minutes or until firm to the touch. Cool completely at room temperature. Set aside. LOWER the oven temperature to 325F/160C/Gas3.
...FILLING:
2. In a large bowl, beat the cheese with the sugar on MEDIUM speed. Combine until smooth. Gradually add the eggs one at the time while beating on very low. Add the vanilla extract, lemon juice and sour cream. Slowly beat until smoothly combined. Don't over beat. Pour the batter into the prepared crust.
...BAKE:
3. Note: If using a' Water Bath' method...add the foiled cake pan and fill the roasting pan of hot tap water by bringing it halfway up the sides of the pan. However, if not using a 'water bath'...make sure to at least place the cake pan onto a baking sheet. BAKE for 90 minutes.
4. With the OVEN turned OFF: Leave everything alone for 1 more hour. Afterwards, open the oven door slightly ajar to let the rest of the heat and steam escape. Later, when oven is no longer warm (about 1 hour)...transfer cake pan to a wire rack. Once it's completely cooled, cover with plastic wrap and place it into the refrigerator. It will be ready to decorate in about 4 hours or longer.
...ASSEMBLY:
5. Place the cake pan on a serving dish. Run a wet thin metal spatula or knife around the sides of the pan and then loosen the spring form clip to release the cake. This cheesecake should be eaten in the next few days or properly plastic and foil wrapped for freezing up to one month.
...TOPPINGS:
...TOPPINGS:
6. CHOCOLATE 'ganache' spread:
In a small-medium bowl pour the milk and the coarsely chopped chocolate and milk together. Place bowl in a bain-Marie and slowly melt the chocolate while stirring once and a while til smooth. Add the butter and syrup. Stir and set it aside until cooled enough, yet spreadable.
7. RASPBERRY 'coulis': In a blender, puree together the reserved peach syrup and raspberries. Set aside.
8. PEACHES: Drain and slice the fruit in thick pieces and set aside.
...DECORATION:
9. Pour and spread the chocolate 'ganache' throughout the surface of the cake.
10. Through a thin sieve...puree the raspberries and pour over the cake while having it slightly drape over the sides.
11. Quickly decorate the complete surface with sliced peaches before the chocolate sets and hardens.
. The covered fruit topping will remain looking fresh for at least 2 days.
10. Through a thin sieve...puree the raspberries and pour over the cake while having it slightly drape over the sides.
11. Quickly decorate the complete surface with sliced peaches before the chocolate sets and hardens.
. The covered fruit topping will remain looking fresh for at least 2 days.
***
If you’re one of those cheesecake foodies like myself...
you’ll never be disappointed with this simple, yet showy dessert.
If you’re one of those cheesecake foodies like myself...
you’ll never be disappointed with this simple, yet showy dessert.
The results are hard to beat for such an indulgence...
that turns out splendidly without too much effort.
that turns out splendidly without too much effort.
Flavourful wishes,
Foodessa
Comments or suggestions ... write me :o)
Claudia at: foodessa [at] gmail [dot] com
Go HERE for more SWEET creations.
Please take note on how I bake and cook...
Here’s a 101 of sorts to make sure that there are no disappointments when trying my creations.
Also...just so you know...feel free to increase the salt and sweet factor since I'm not high on either of them ;o)
. Use DRY cup measurements for...you guessed it...all DRY ingredients.
Anything DRY gets measured by spooning the overfilled ingredient (never shake the cup) and then level off with a flat edged tool. Exception...Brown sugar should be packed in and leveled.
. Use LIQUID cup measurements for...all LIQUIDS that cannot be leveled like for example butter, yogurt...etc. Measure the liquids at eye level to avoid overdoing what the recipe truly needs.
. OVENS are unfortunately not created equal. Mine is so old that it has reached many degrees off it's norm. It's really worth investing a few dollars to test yours with an appropriate oven thermometer. You'd be surprised how many ovens I've heard about not being where they should have been. Before you lose any more ingredients and much time preparing a new recipe...run to the store...you'll thank me later.
Other related desserts that may inspire you:


.JPG)
.JPG)


