.
.
.
Showing posts with label Ricotta cheese. Show all posts

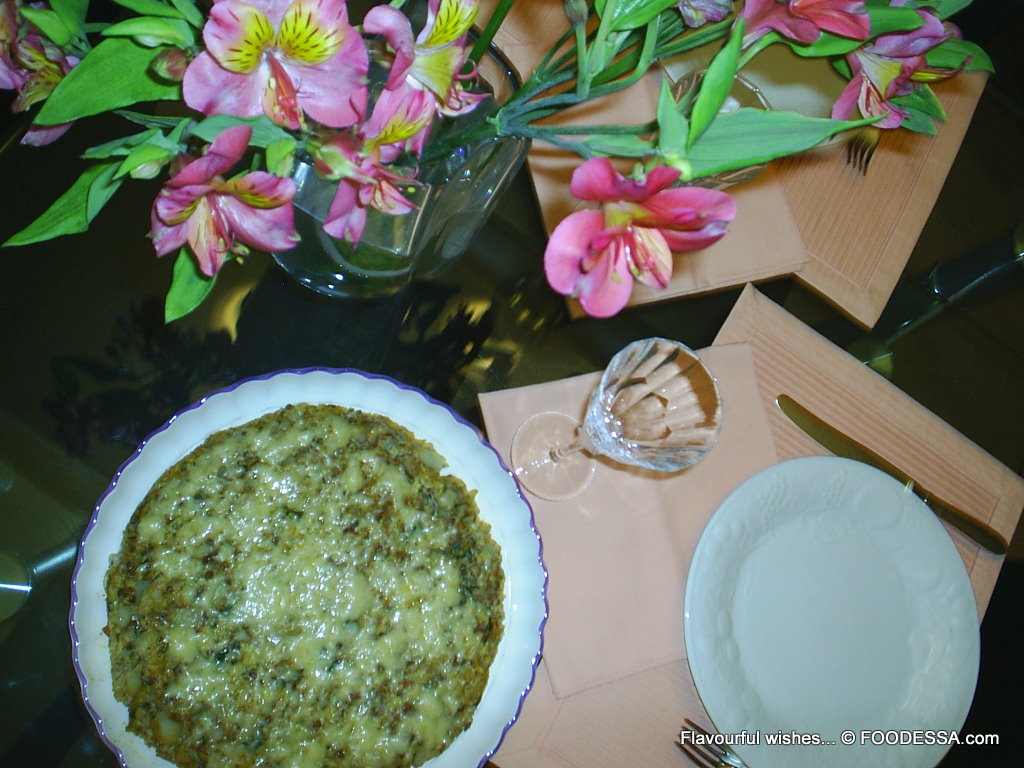
Tortilla Veggie Ricotta QUICHE {gluten-free}


Offerings from a no-dough foundation to a glorious crown of tortilla corn chips.
A distinctive quiche to honour the two most influential women in my life.


There had always been a very robust triangular symbol in our family.
It had reflected the three generations of strong minded women.

At the head of our Italian family was my very endearing, 'Nonna Rosa'...
...my Mommy who was the glue that held everything together...
....and myself who always carried on to please both of them.


With the Autumn season upon us, I am reminded of our loss of our precious 'Nonna'. 
She was our Queen Bee with a unique personality and certainly a force to be reckoned with.
She was a beloved leader and an incredibly opinionated speaker...she sure was ;) 
She possessed an remarkable aura that had people desiring to be around her all the time.  


Although I miss my 'Nonna's' physical presence, I do always feel her nearby my kitchen sanctuary.  Really, I'm not just saying it as a strange ghostly statement.  I can actually hear her in a sort of loud whisper...especially when making desserts.   Like for instance, she had never been shy to express her gentle opinions concerning my culinary skills:  "The cake turned out very moist...but...maybe next time, a little more sugar should be added."  Other times she'd say..."The cookies are so tasty...but...maybe, a little less baking time would have been better."  


Back when I lived at my other home surrounded by a substantial flowering garden, she would also have to poke her nose at my landscaping creations..."It's very beautiful Claudia...but...maybe it's still a little too green...a few more pops of color would be better."   Pink, was her favourite color...so I planted plenty of autumnal Chrysanthemums in my garden.  Surrounded by beautiful color and harmony is what I look forward to every day.   


Growing up, I've always challenged myself more than usual.  I guess there were a few too many expectations placed on me without realizing it at the time.  
Jeez,  growing up towards adulthood, I always wondered if I'd measure up.  In reality, my Nonna's sense of balancing the negative remarks with something positive wasn't too hard to handle after all.  It did indirectly push me to strive to do better.  
In many ways, I've been told that I've pretty much carried on her legacy.  I now sound and somewhat act like her.  Yikes...hopefully, that turns out to be a positive thing.


My dear, gracious Mommy was usually in the middle of all this.  All she really desired was for her Mom to think she was a wonderful daughter and for me to excel after she had set a solid path of principals for me.  She has certainly achieved being a great parent and setting the perfect example.  She can certainly rest easy on that success ;o) 

Oh...and did I forget to mention that our 'Nonna' loved quiche.
Mom, as well...and she's been asking me for my no-dough crust quiche for quite some time.  

So, without further a due, I'd like to dedicate this symbolic quiche to two exceptional women.


crowned Queen
Tortilla crust Veggie Ricotta Quiche
 {gluten-free}
serves 4-6 persons


Click HERE for a PRINTER version


INGREDIENTS:
(American / Metric measures)

Part 1
.. 3 Tbsps. (45ml) grapeseed oil
. 1 large, sweet onion, thinly sliced
. 1 small garlic clove, minced
. 1 medium red bell pepper, thinly sliced
. 8 sun dried tomatoes, chopped
. 1 big bunch of Kale greens, stemmed and chopped
. 1/8 cup (30ml) dry white wine
. 1/4 tsp. (1ml) sea salt
. 1 Tbsp. (15ml) mix of Italian dried herbs
Part - 2
.  6 xLarge eggs
. 1 cup (250g) fresh Ricotta cheese
. 1/8 tsp. (.5ml) sea salt

. 40-45 Tortilla corn chips *
. 14 pitted, low salt black olives
. generous handful of roasted nuts of choice (optional)

* The foundation of this quiche makes use of all the broken tortilla chips found at the bottom of the bag.


PREPARATION:
. Pre-heat the oven to 375F/190C/Gas5.
. Position the rack on the second level from the bottom.
. Use a large, round 10 x 2 inch (26 x 5cm) shallow, oven-proof dish.  

. Generously grease dish with vegetable oil.  


Part 1 - Vegetable mix can be prepared ahead of time:
1. In a large skillet, heat the oil and butter.  Add the onions and sauté a few minutes before adding the garlic and pepper slices.   Cook through until caramelized.  Lower the heat to MEDIUM-LOW.  This will take about another 10 minutes or so.
2.  Turn up the heat slightly.  Then add to this mix, the sun-dried tomatoes as well as the greens (stemmed, washed and spun dry).
3. Continue to cook until the greens have shrank halfway.  Add a generous splash of wine.
4. Add seasoning last.  Toss until well combined.  Turn off the heat and keep the mix ready to receive the egg-ricotta blend.  Set aside.


Part 2 - Assembly:
5. In a blender, mix the eggs, salt, as well as the ricotta and blend until smoothly combined.
6. Place enough Tortilla chips to cover the bottom of the dish. 
7. Spread the vegetable mix evenly on top and lightly pat down.
8. Pour the creamy egg-ricotta mix slowly over top.  Sprinkle with the (optional) roasted nuts and garnish with the black olives.
9. Lastly, around the perimeter of the dish, dig and place each Tortilla chip (wide-side down) by over-lapping them.  These will have to be snuggled together in order to form the proper shield.
. BAKE for about 40-45 minutes.  Remove from the oven and let it rest for 15 more minutes before serving. 


In memory of our beloved 'Nonna'...
thank you for influencing us with your strength...
contributing to our positive outlook and ultimately to our well being.

I hope that when you have a chance to realize such an unusual quiche...
you'll connect with a similar symbolic affection.

Have a wonderful week everyone.

Flavourful wishes,
Foodessa


Comments or suggestions ... write me :o)
Claudia at: foodessa [at] gmail [dot] com


Go HERE for more SAVOURY creations.


Please take note on how I bake and cook...
Here’s a 101 of sorts to make sure that there are no disappointments when trying my creations.  
Also...just so you know...feel free to increase the salt and sweet factor since I'm not high on either of them ;o)

. Use DRY cup measurements for...you guessed it...all DRY ingredients.
Anything DRY gets measured by spooning the overfilled ingredient (never shake the cup) and then level off with a flat edged tool.  Exception...Brown sugar should be packed in and leveled.
. Use LIQUID cup measurements for...all LIQUIDS that cannot be leveled like for example butter, yogurt...etc.  Measure the liquids at eye level to avoid overdoing what the recipe truly needs.
. OVENS are unfortunately not created equal.  Mine is so old that it has reached many degrees off it's norm.  It's really worth investing a few dollars to test yours with an appropriate oven thermometer.  You'd be surprised how many ovens I've heard about not being where they should have been.  Before you lose any more ingredients and much time preparing a new recipe...run to the store...you'll thank me later. 


Two CANNOLI special and MY first DATE

Cannoli inspired reunion
...filled with smooth joyfulness

Yesterday...I had my very first date...
my very first date...with a local Montreal Foodie.
It was a long awaited reunion of sorts.
Many emails later...our Foodie date was upon us.
We were both excited that our...
mini tour was finally taking place.

My thank you gift to her (you’ll understand soon enough)...
was a box filled with fresh crispy empty cannoli.
Shells for her to fill with a unique recipe of her choosing.
Of course...I also did get each one of us a delicious Ricotta cannoli.
We actually devoured it within the first 5 minutes we had our encounter.
All this...right before we had organized to have our lunch!

This sweet before savoury...
had just hit our Foodie spot.

Therefore, before the lunch...we both agreed enthusiastically...
why not make a pit stop at the specialized stuffed dates boutique first.
***


This is how this union was inspired...
Sometime between last Fall and Winter...I started straying from my work related research.  Considering I'm an incredibly early riser...I gave myself permission to do some fluff cyber browsing. I was terribly attracted to the very interesting multitude of food related blogs. Before then, I had heard of people blogging...however, in truth, I didn't really think I would have any interest in this...let alone start one myself.


During these non-related work searches...I was slowly realizing how overwhelming this new found blogasphere was. Everything seemed so interesting. The stories around food and their related recipes were calling me constantly to action. During that time, I somehow happened to fall on a little known community food site called the 'Daring Kitchen'.


During that same time, there was an interview with a passionate blogger from Montreal on this very site. Naturally, coming from this city myself...I got curious. As I started reading...she slowly lured me in and somehow made me reflect on how come I didn't dive into this world sooner?  I kept reading to later also connect her to a Montreal restaurant 'Meetup' group focusing on frugal fare ethnic eateries. Sounded good to me...so I decided to join with Hubby.

Until the next restaurant get together...loads of time passed.
We had quite a few interesting emails back and forth.
Finally during the Christmas period...
we met at her holiday celebration at a Korean restaurant.
There, as you can imagine...being the founder of the group and all...
she was understandably the woman of the hour.
We exchanged a few kind words and a few mild chuckles
and pretty much continued our individual socializations.
We said we'll catch up at a later time.

Later was yesterday...
but before that...please indulge me as I back track just a little bit more.


After having seen the movie Julie and Julia...I then left for Paris in September of last year. I was really pumped up after that movie. Remember...I was still a newbie in the blogasphere Foodie world! During that movie I really started to get the whole blogging thing. It wasn't a waste of time at all. What I gathered in that short period was somewhat life changing...I just didn't realize how much yet!


I left on this European adventure...and during all that time I started looking at food a little differently...with, as I can only describe as the eyes of a child.


Outdoor markets with their multitude of colors and fragrance just refresh my spirit.


Varieties of food laid out ready to be eaten or transformed into another unique dish...became even more exhilarating than ever to me.  Add this enhanced experience to that of the new found discovery of food blogging ... so many more unanswered questions and curiosities remained in my mind.  I was internally tormented...trying to deter myself from getting into yet another project.


Wasn't my plate full enough already?
It certainly was.  However, now, more than ever...food was more so in my thoughts and conversations. Could that be possible? I have a mega collection of recipe books...and I certainly do know my way around the kitchen pretty well. The question however still remained...could I also start journaling about this interest?  How much time did I really have to dedicate to this passion of mine. It's one thing to cook and bake all the time intertwined through my hectic schedule...but, did I really want to take photos and explain everything in detail?


I paused...reached deep down in my thoughts and I finally convinced myself that it was darn time that I started doing something that would truly satisfy and entertain me.
This culinary journey was no longer a desire...it was becoming a necessity to keep my sanity in check.


As I'm writing this post...
I can't help but feel a great sense of joy, pride and satisfaction.
Just the amazing connections with extremely talented
bloggers (you know who you are) alone have made it worthwhile.
However, Hubby may beg to differ...well, only really...
when his meal is getting cold while I'm trying to take
that 'quasi' perfect shot with my dinosaur camera.

Now, just because there are local foodies in your home town...
does not necessarily mean that you'll meet them in person.
However, in my case...a probable meeting had slowly
started to take shape all because of an Italian Cannoli.


What would a cannoli have anything to
do with our possible Foodie date?


This whole situation unfolded and departed because of a challenge at daring kitchen to make Italian Cannoli from scratch:
My Foodie friend took part of this challenge...which of course lead to my comment on her blog...which then sparked a
debate on where to find the best cannoli pastry in and around Montreal. 

Small side note: There's also another ongoing debate about using...Ricotta and / or Mascarpone or a bit of both? Using super fine sugar or confectioners sugar?  Chunks of dried fruit?...Citrus zest?...Crushed nuts?...Chocolate?...Flavouring?  You name it...it's out there somewhere.

Today, I'm kind of going for the jugular...
I'm sharing my cannoli filling recipe with added whipped cream to the mix.
Oh...did I just initiate another debate?

I say to this...go with your preference.
Knock yourself out.
In the meantime, I had also been informed by a very reliable
source of the lack of proprietary pastry shop cannoli shells.
Apparently to my astonishment...
most pastry shops have their shells delivered.
What???...I've not been buying the originals...how deceiving.

credit: Parsley, Sage, Desserts and Line Drives

After asking around...it seems that due to how time consuming it is to make shells as well as the health issue surrounding the abuse of frying oil...most pastry shops decided it was best to buy from another shell dedicated supplier.
So the quest was on...to find at least one of them standing. One that had extremely, freshly made shells and tasty smooth fillings.  Eureka...I had finally found one...and not too far from my home.


As I've already mentioned...
there are plenty of versions of the cannoli that have been altered through...
the hands of several Italian regions and so many more bakers around the world.
However, during our trip in Sicily...
we came pretty darn close to eating what we could only imagine to be...
the most authentic Italian cannoli which had originated in Palermo.
Here's a cannoli we truly enjoyed on a beach in Sicily...
precisely in a very charming  and unforgettable
North Western coastal town of San Vito Lo Capo. 

I'll leave the authenticity to the ones who do it best.
In the meantime...I've enjoyed tinkering with this recipe...
and this is what I've grown to appreciate best.
It is a very lightly smooth textured mousse like cream filling...
versatile enough to add your own personality to it.
***

my RECIPE for...
Ricotta Maple Syrup
CANNOLI filling

Scrumptious smooth and creamy cannoli ‘Impastata’ type filling
yields cream for a dozen cannoli shells

INGREDIENTS:
(American / Metric measures)


. 1-1/4 cups (300g) fresh Ricotta cheese *
. 1/2 cup (100ml) pure Maple syrup
. 1 tsp. (5ml) pure vanilla extract
. 1/2 cup (100ml) whipping cream 35%

Add-ins selections (all optional):
. 1 small orange finely zested
. 1/4 cup (40g) roasted almonds, coarsely crushed
. 1/4 cup (45g) bittersweet chocolate, finely grated
. 1/2 tsp. (2.5ml) ground cinnamon

* Ricotta 'la Fiorella' fresh cheese...so named in our local Quebec stores.
Note:   Do not use container Ricotta for this recipe. I highly recommend an effort towards buying the best fresh Ricotta...please inform yourself through your Cheese specialty store.


PREPARATION:
1. In a medium bowl, whip the 35% cream and set aside to chill in the refrigerator.
2. Get all other 'Add-in' selections prepared and also set aside.
3. In another medium bowl: Mix the ricotta, the Maple syrup and vanilla extract with an electric beater to ensure smoothness. 
4. Lightly with a spatula, gradually fold the whipped cream into the ricotta mix and combine until streaks have disappeared.
5. Lastly, gently fold in the rest of your 'Add-in' selections and you're done.
6. Cover and place into the refrigerator for at least 30 minutes before pipe filling the cannoli shells. 
Note: This mix can be done the day ahead and piped right before serving.  The shells will be crunchier that way.   Enjoy this specially created Cannoli cream filling ;o)


Suggestion: If you also desire to have an impressive version of the stuffed cannoli...
just open your freezer and get out your favourite ice cream...soften and stuff.
A real delight is guaranteed.


Well, this whole experience from way back in the Fall of 2009 until
this re-counting of events...was for me...a full-circle moment.


I could only wonder how many more rounds I will end up
circling through this culinary journey of mine?


Flavourful wishes,
Foodessa

Comments ... ??? ... or suggestions ... write me :o)
Claudia at: foodessa [at] gmail [dot] com


Go HERE for more SWEET creations.


Please take note on how I bake and cook...
Here’s a 101 of sorts to make sure that there are no disappointments when trying my creations.  
Also...just so you know...feel free to increase the salt and sweet factor since I'm not high on either of them ;o)
. Use DRY cup measurements for...you guessed it...all DRY ingredients.
Anything DRY gets measured by spooning the overfilled ingredient (never shake the cup) and then level off with a flat edged tool.  Exception...Brown sugar should be packed in and leveled.
. Use LIQUID cup measurements for...all LIQUIDS that cannot be leveled like for example butter, yogurt...etc.  Measure the liquids at eye level to avoid overdoing what the recipe truly needs.

. OVENS are unfortunately not created equal.  Mine is so old that it has reached many degrees off it's norm.  It's really worth investing a few dollars to test yours with an appropriate oven thermometer.  You'd be surprised how many ovens I've heard about not being where they should have been.  Before you lose any more ingredients and much time preparing a new recipe...run to the store...you'll thank me later. 

CITRUS glazed RICOTTA cookies

Tangy LEMONS and sweet ORANGES...
will delight you in every bite from these cake-like cookies.


The very first time I was given the pleasure to be introduced to these lovely textured, tangy mouthfuls was at a bridal shower.

Before that moment, although I have baked my share of Ricotta based goodies....I had never heard of or tried these cake-like cookies.


Actually, the ones I had tried that day...
were flavoured solely with lemon.


Obviously, for me to want to bake yet another cookie which at this point was really not appropriate since bathing suit season is a knocking...did I need to have more temptation???  Not really!
 
So, what came next... I shamefully convinced myself that I was going to show a lot of restraint. After all, these babies did apparently freeze very well.

So, I went forth with my 'pushiness' and asked around to whom I should be speaking to in order to 'mooch' off this recipe.
She, unlike some who usually guard their precious recipe secrets...had so generously offered to email it to me very soon. 
Now...the word soon (as far as I'm concerned) means give or take within the next week. Well, what planet was I from?  Not in todays' timeline it seemed. 

Tick tock...I got slightly impatient and headed off on my all dependable cyber search. Oh, boy...did I get a few versions of this type of recipe or what!  I knew that I was probably going to end up twisting everything and making it my own...so I went ahead and picked five of the best versions out there.
Alright, it was time to evaluate each one...make my notes and re-revise them carefully before I got to baking them that weekend.
To my delight...before the week was up...guess which email had arrived?  Oh, I was soooo pleased.  Especially since her recipe is what got me started on this little obsession of mine. The only way I can explain this type of behaviour...hormones...my excuse to any strange-like craziness. ;o)

I took a very careful look at her recipe and decided that the recipe I had concocted with the additional taste of orange and other important tweaks might have a chance to turn out better in texture and flavour. I also decided to make one quick change about the sugar content...and off I went.


CITRUS glazed RICOTTA cookies
makes 4 dozens

Click HERE for PRINTER version


 INGREDIENTS:
(American / Metric measures)

Reserve citrus juice to use in both parts of the following recipe:
. 1 big lemon, finely zested and juiced
. 1 big orange, finely zested and juiced
___________________________________________

...DRY:
. 2 cups (300g) All-Purpose flour
. 1 tsp. (5ml) baking powder
. 1/2 tsp. (2.5ml) sea salt
. 1/4 tsp. (1.25ml) baking soda
...WET:
. 1/2 cup (125g) unsalted butter (softened)
. 1-1/4 cups (275g) granulated sugar
. 1 xLarge egg
. 1 cup (230g) Ricotta cheese
. 2 Tbsps. (30ml) lemon juice
. 2 Tbsps. (30ml) orange juice
. 1 Tbsp. (15ml) each of the finely zested citrus

...for the cookie GLAZE:
. 1 cup (150g) confectioners' sugar
. 1-1/2 tbsp. (45ml) each of the citrus juices

PREPARATION:

. Pre-heat the oven at: 350F/180C/Gas4
(only once the dough has been chilled for at least 1 hour).
. Position the rack on second level from bottom of the oven.
. Line two large cookie sheets with parchment paper.


...DOUGH: 
1. In a large bowl, sift together all the DRY ingredients. Make a well.  Set aside.
2. In a medium bowl, beat the butter with the sugar until fluffy.  Then, beat in the egg as well as the Ricotta cheese, followed by the portion of citrus juice and zests allocated to this part of the recipe.

... ASSEMBLY: 
3. Pour the WET mixture into the DRY  one.  With a spatula, combine and fold until flour disappears. Do not over mix.  Cover and refrigerate for about 1 hour.   Note: About 20 minutes before the chilled cookie dough is taken out of the fridge, start pre-heating the oven. 
4. Set up one baking sheet at the time. Then, with two spoons, roughly shape 24 walnut-sized cookie portions.  Place them about 1 inch (5cm) apart.   The remaining dough should be placed back into the fridge until a few minutes before the first cookie batch has baked.
. BAKE for about 18 minutes or until lightly gold on the edges.  When ready, have them cool on the pan for about 5 more minutes.  Then, transfer them onto a cooling rack.  Repeat for the next cookie sheet.

...GLAZE: 
5. In a small bowl, sift the icing sugar. Then, whisk in the remaining citrus juices until smooth.  At this point, make sure the glaze has a slightly thick consistency.  If not thick enough, add more icing sugar.
...SETTING the GLAZE: (Only once the cookies have properly cooled)
7. Take the same pieces of parchment used for baking and place them under the racks which you’ll be using to set the glaze on the cookies.  Slowly spoon the glaze over each cookie surface.  Let them rest on the racks for at least 90 minutes.
...STORAGE tips: 
. Place them into an airtight metal container layered by parchment paper for up to 1 week.  Or, better yet, preserve their freshness by packaging them into a parchment paper and into a freezer bag for up to 1 month.   Enjoy.


The verdict:
I was absolutely thrilled with my boldness.
Due to my tenacity to make this recipe my own, everything turned out great.

I have made sure to update this recipe so that the next batch of cookies will turn out perfectly.

Let’s put on the coffee and
get ready to enjoy these cuties.

Flavourful wishes,
Foodessa


Comments ... ??? ... or suggestions ... write me :o)
Claudia at: foodessa [at] gmail [dot] com

Go HERE for more SWEET creations.


Please take note on how I bake and cook...
Here’s a 101 of sorts to make sure that there are no disappointments when trying my creations.  
Also...just so you know...feel free to increase the salt and sweet factor since I'm not high on either of them ;o)
. Use DRY cup measurements for...you guessed it...all DRY ingredients.
Anything DRY gets measured by spooning the overfilled ingredient (never shake the cup) and then level off with a flat edged tool.  Exception...Brown sugar should be packed in and leveled.
. Use LIQUID cup measurements for...all LIQUIDS that cannot be leveled like for example butter, yogurt...etc.  Measure the liquids at eye level to avoid overdoing what the recipe truly needs.
. OVENS are unfortunately not created equal.  Mine is so old that it has reached many degrees off it's norm.  It's really worth investing a few dollars to test yours with an appropriate oven thermometer.  You'd be surprised how many ovens I've heard about not being where they should have been.  Before you lose any more ingredients and much time preparing a new recipe...run to the store...you'll thank me later. 


Here are a few more CITRUS based desserts that may be of interest: