
Squash, pumpkin or sweet potato make perfect partners within these creamy cheese biscotti.
Aromatic herbs or seeds can easily replace the French tarragon in this crunchy bite.

We just got our first mini snowfall and yet...I have barely...
planned what I'll be making for the upcoming Christmas festivities.
Has anyone really? If you have...I do forgive you.

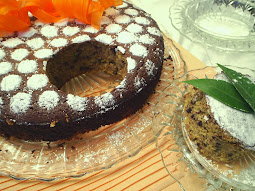
What I have done is hosted a small dinner where I had the chance to showcase these biscotti.
We have had them bread-like as well as rendered into this favourite biscotti texture.
They are simple to make and look beautiful served alongside a cheese platter.

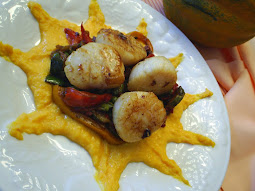
Have them accompany your favourite soup or a stuffed squash and you have a quick week night meal.
Give them a try...they will not disappoint.

Squash Goat Cheese Tarragon biscotti
Note: If wanting to keep it bread-like...
just do not re-bake them to make biscotti. Excellent as well.
makes about 18-20 biscotti
PRINTER VERSION

Aromatic herbs or seeds can easily replace the French tarragon in this crunchy bite.

We just got our first mini snowfall and yet...I have barely...
planned what I'll be making for the upcoming Christmas festivities.
Has anyone really? If you have...I do forgive you.

What I have done is hosted a small dinner where I had the chance to showcase these biscotti.
We have had them bread-like as well as rendered into this favourite biscotti texture.
They are simple to make and look beautiful served alongside a cheese platter.

Have them accompany your favourite soup or a stuffed squash and you have a quick week night meal.
Give them a try...they will not disappoint.

Squash Goat Cheese Tarragon biscotti
Note: If wanting to keep it bread-like...
just do not re-bake them to make biscotti. Excellent as well.
makes about 18-20 biscotti
PRINTER VERSION

INGREDIENTS:
(American / Metric measures)
Part-1:
. 1/4 cup/ 2.2oz. (60g) unsalted butter, softened
. 1/2 cup/ 4.5oz. (125g) mild Goat cheese*, softened
. 1/2 cup (125ml) roasted Squash** room temp.
. 2 xLarge eggs, room temp.
. 1 Tbsp. (15ml) granulated sugar
Part-2:
. 2 cups (330g) All-Purpose flour
. 1-1/2 tsps. (7.5ml) baking powder
. 1 tsp. (5ml) sea salt
. 1/2 tsp. (2.5ml) granulated garlic powder
. 2 Tbsps. (30ml) dried Tarragon*** crushed
SUGGESTIONS:
* Cream cheese can be used instead of Goat cheese.
** Preference of Squash variety: Ambercup, Buttercup or Butternut. Also, Pumpkin and Sweet Potato can be used successfully.
*** Dried Tarragon can be replaced by Basil, Oregano, Rosemary or crushed fennel seed.
GLUTEN-FREE VERSION: 2 cups of all-purpose flour can be replaced with 2 cups (330g) of chickpea flour added to 1/4 cup (28g) arrowroot starch plus 2 tsps. (10ml) apple cider vinegar.
VARIATION with great results:
Use Cream cheese and the following seasonings: 1/2 tsp. (5ml) anise seed (crushed), 1/2 tsp. (5ml) mustard powder, 1/2 tsp. (2.5ml) mild paprika, 1/4 tsp. (1.25ml) freshly grated nutmeg.
PREPARATION:
1. In a large bowl, put together ALL the ingredients from Part-1.
Let them soften to room temperature. This will take at least 1 hour.
...
. Pre-heat oven to 350F/180C/Gas4.
If using a dark colored pan: lower the heat to 325F/160C/Gas3.
. Position the rack in the center of the oven.
. Parchment line a large baking sheet or use a Silicone pad (preferred).

2. Right before getting ready to make the dough, combine ALL ingredients from Part-2 in a medium bowl and set aside.
3. With an electric beater, combine the softened ingredients from Part-1 until somewhat fluffy.
4. On LOW speed, add and beat in the ingredients from Part-2 . Finish by using a strong spatula to bring the dough together. The dough should be thick enough to handle. Note: this mix can also be made ahead of time by wrapping it into a plastic wrap and into the refrigerator for up to a day.
5. Pat down the dough and place it in your hand to slightly shape it into a thick log of sorts.
6. Place it onto the parchment paper and carefully shape a 4x12 inch (10x30cm) long rectangle. Work it gently until it becomes a compact package.
7. BAKE it for the first 35 minutes. Remove it from the oven and let it cool on the pan for 15 minutes. Transfer the baked log onto a board to carefully slice it on the bias into 1/2 inch (1.5cm) thick pieces.
8. Gently place the cookies back onto the baking pan with the cut sides down. BAKE AGAIN for only 20 more minutes. Again, remove the pan from the oven and cool for 5 minutes before transferring biscotti onto a rack to cool.
. Store them into a cookie tin for about 2 weeks or freeze for longer periods. Enjoy.

To all my American friends, enjoy giving thanks during this upcoming holiday.
All the very best in the upcoming weeks of craziness ahead ;o)
Flavourful wishes,
Foodessa
Comments ... ??? ... or suggestions ... write me :o)
Claudia at: foodessa [at] gmail [dot] com
Go HERE for more SAVOURY creations.
Please take note on how I bake and cook...
Here’s a 101 of sorts to make sure that there are no disappointments when trying my creations.
Also...just so you know...feel free to increase the salt and sweet factor since I'm not high on either of them ;o)
. Use DRY cup measurements for...you guessed it...all DRY ingredients.
Anything
DRY gets measured by spooning the overfilled ingredient (never shake
the cup) and then level off with a flat edged tool. Exception...Brown sugar should be packed in and leveled.
. Use LIQUID cup measurements for...all LIQUIDS that cannot be leveled like for example butter, yogurt...etc. Measure the liquids at eye level to avoid overdoing what the recipe truly needs.
. OVENS are
unfortunately not created equal. Mine is so old that it has reached
many degrees off it's norm. It's really worth investing a few dollars
to test yours with an appropriate oven thermometer. You'd be surprised
how many ovens I've heard about not being where they should have been.
Before you lose any more ingredients and much time preparing a new
recipe...run to the store...you'll thank me later.


.JPG)