
Butternut squash realizes down time with sweet, mild honey.
Elegant lines gave way to a more relaxed, rustic tug from enthusiastic hands.

A slight chill in the air and the carb addict in me just couldn't wait to make bread.
Not just any bread.
An enticing pull apart bread which gifted us warm, delicious buns.

Throughout our Laurentian region in Quebec...
the colors have yet to shine their rainbow.

The unexpected warmer weather has dampened the picturesque scenery we're used to.
However, no matter, the Autumn has definitely started painting its palette.
Enjoy some photos of Val David, Laurentian.


Any starchy, baked Squash pulp will work wonderfully in these buns.
Don’t have Semolina flour...no worry...just replace it with plain flour.
This recipe is fairly forgiving. Now, let's get baking.
Don’t have Semolina flour...no worry...just replace it with plain flour.
This recipe is fairly forgiving. Now, let's get baking.

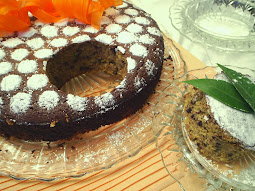
SQUASH rustic pull apart bread buns
yields 15 medium buns
INGREDIENTS:
(American / Metric measures)

. 1 Tbsp. (15ml) active dry yeast (aka 'Traditional')
. 2 tsps. (10ml) granulated sugar
. 1/2 cup (125ml) warm water (~110F/ 43C)
WET mix:
. 3 xLarge eggs
. 3 Tbsps. (45ml) mild honey
. 1 cup (250ml) roasted, Butternut squash, mashed
DRY mix:
. 3-1/2 cups (560g) A.P. flour
. 1 cup (165g) fine Semolina flour
. 1/4 cup (30g) ground flaxseed
. 1 Tbsp. (15ml) sea salt
PREPARATION:
. YEAST liquid:
1. In a medium sized measuring cup, pour the warm water (~110F/ 43C). Add the sugar and yeast to the water. Give it a good whisk to dissolve. Lightly cover with plastic wrap and place it into a draft-free area like a turned off oven. Let the yeast properly foam and activate for about 10 minutes.
. WET mix:
2. In a large measuring cup, lightly whisk the eggs. Add and whisk in the honey and squash. Set aside.
. DOUGH:
3. Place the flour(s), flaxseed and salt into the mixing bowl of a food processor / mixer. Use the dough attachment and adjust to a MEDIUM speed (#2 for most).
4. Start whirling the flour mix before very slowly pouring the yeast liquid through the top spout.
5. Now, gradually pour in the egg and squash mix.
6. The dough is ready pretty quickly as it pulls back from the sides of the bowl and forms a ball. Let the machine run for another 3 minutes.
. PROOF - DOUGH at REST:
7. Turn the dough into a large and generously oiled bowl. Let it rise with a plastic wrap tightly covering the bowl, topped with a tea towel. Place it into a draft-free oven and let it rise to double for 1 hour.
8. Take the dough out to "punch" it down in order to release its gases. Place the covered bowl back into the oven to have it continue rising for another 15 minutes.

. ASSEMBLY:
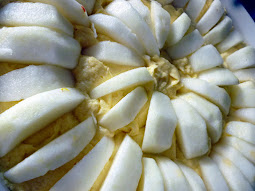
9. Lightly oil a very large, rectangular pan. Then, lightly flour a parchment paper to place the risen dough. Roll it into a log and slice it into 15 even pieces. Roll each piece into rustic balls and place them in the pan with reasonable space in between. Cover the pan with an oiled plastic wrap and then also add a towel over top. This time, give them a chance to rise on the counter. A proper rising will take 1-1/2 hours.
. BAKING:
. Position the rack at the bottom of the oven.
. Pre-heat the oven to 350F/180C/Gas4.
. BAKE for 30 minutes in a dark pan or 25 minutes in a lighter one. The buns should have turned golden brown.
. Remove pan and let the buns cool for about 15 minutes before flipping the whole pan onto a large metal rack. Afterwards, re-flip the buns again. About 15 minutes later, gently pull the bread buns apart. Note: These buns freeze very well.

After a little nature stretch...some kitchen time is awaiting...
especially with the Canadian Thanksgiving right around the corner.
especially with the Canadian Thanksgiving right around the corner.
Warm bread out of the oven anyone?
A great pull apart bread to kick in some fun at the table.
A great pull apart bread to kick in some fun at the table.
Flavourful wishes,
Please take note on how I bake and cook...
Foodessa
Comments ... ??? ... or suggestions ... write me :o)
Claudia at: foodessa [at] gmail [dot] com
Go HERE for more SAVOURY creations.
Please take note on how I bake and cook...
Here’s a 101 of sorts to make sure that there are no disappointments when trying my creations.
Also...just so you know...feel free to increase the salt and sweet factor since I'm not high on either of them ;o)
. Use DRY cup measurements for...you guessed it...all DRY ingredients.
Anything
DRY gets measured by spooning the overfilled ingredient (never shake
the cup) and then level off with a flat edged tool. Exception...Brown sugar should be packed in and leveled.
. Use LIQUID cup measurements for...all LIQUIDS that cannot be leveled like for example butter, yogurt...etc. Measure the liquids at eye level to avoid overdoing what the recipe truly needs.
. OVENS are
unfortunately not created equal. Mine is so old that it has reached
many degrees off it's norm. It's really worth investing a few dollars
to test yours with an appropriate oven thermometer. You'd be surprised
how many ovens I've heard about not being where they should have been.
Before you lose any more ingredients and much time preparing a new
recipe...run to the store...you'll thank me later.


.JPG)