
Can you achieve a gluten-free cake with only one flour variety?
Well, maybe not the incredibly mile-high cake yet.
However, with these four torte cakes, I'm well on my way to finding out.

My pursuit of gluten-free baking has been ongoing behind the scenes.
Most of this experimental culinary journey took form with simply using...
'sweet SORGHUM white flour' in the following delicious tortes:
- Ricotta Orange Chocolate torte cake -
- Port Fig Yogurt torte cake -
- Apple Pecan Raisin spice torte cake -
- PLUM buttermilk torte cake -

Many may want you to believe that a few gluten-free flours need to be...
combined in order for a cake to hold together with great texture.
In my opinion, the added guar gum ingredient which is increasingly integrated is not really necessary.
Sorry to the fans of this undesirable ingredient...I refuse to use it.
I'm here to tell you that I've been successfully challenging the popular and regular gluten-free desserts.
I’ve found myself stubbornly defeating the popular vote.
I can finally declare that my tenacity paid off and I find myself quite comfortable with my disposition.

Some time last year I had also pronounced myself as capable to succeed a 1:1 substitute ratio in baking with a single choice gluten-free flour which replaced all-purpose flour.
The incredibly scrumptious fresh Fig Nut torte cake had pushed me forward into experimenting further with Sorghum flour.
I do appreciate chickpea as well as millet, quinoa, and finely grinded brown rice flours...
however, none have been as versatile as 'sweet sorghum white flour'.
For those who still are not familiar with this flour...here's a small explanation:
Sorghum flour (a.k.a. 'Sweet Sorghum' or 'Jowar'...or ‘Jowar Atta‘ ...found in Indian specialty stores):
This flour makes an excellent wheat flour substitute in quick-leavened baked goods such as muffins or banana bread. It is ground from the small, millet-like grains of the sorghum plant (used to make sorghum syrup). Sweet white sorghum flour is a pale pinkish-brown in color and has a pleasant, faintly sweet and grassy taste. It is best combined with a gluten-free starch such as cornstarch or tapioca and creates a fine crumb, good texture. --ref. Wiki
Suggestions and Tips:
. This type of flour can easily be found in any health food store. Many regular grocery stores are now carrying it in their specialty divisions also.
. Purchase the very freshest of this Sorghum flour and in very small quantity...because, once opened...the rancidity factor escalates.
. Always store this flour in a sealed glass jar and inside the refrigerator.
Here are a few tips in order for the stand-alone Sorghum flour to succeed in baked goods:
. Add a little extra butter, oil, and eggs. As well, these substitutes can also replace a portion of the fats: applesauce, prunes or mashed banana.
. Adding a small quantity of apple cider vinegar also improves the volume of the batter.
***
After having made a variety of these baked non-gluten delights...
I have partially concluded that the torte style cakes have worked out best with Sorghum flour so far.
Therefore, my friends...here, I’ll share a few cakes...
which turned out successfully and scrumptiously.
which turned out successfully and scrumptiously.

Note:
For all cakes mentioned here:
The amount of Sorghum flour and baking powder can also be substituted fully with...
the exact quantity of regular All Purpose flour and baking powder as well.


Apple Pecan Raisin spice torte cake ... Serves 8-10
Inspired by my Mother-in-law's favourite and super simple apple cake squares. This is a no-fail, foolproof cake which can be made in no time at all. The bonus is that there's no electric mixer required either.
Click HERE for PRINTER version
INGREDIENTS:
Inspired by my Mother-in-law's favourite and super simple apple cake squares. This is a no-fail, foolproof cake which can be made in no time at all. The bonus is that there's no electric mixer required either.
Click HERE for PRINTER version
INGREDIENTS:
(American / Metric measures)
PREPARATION:
1. Lightly oil the cake dish or pan and set aside.

* The CHOCOLATE pastilles (premium chocolate chips): come from the French Chocolate house of Michel Cluizel. My preference is a 65% bittersweet cacao from Madagascar. This can be found in specialty chocolate or pastry shops.

* Note: If macerated Port figs are not part of your ingredients, an alternative could be to soak dried figs in Port of other chosen liquor for at least 2 hours ahead of making the cake. Just make sure they are properly strained of their liquid.


Comments or suggestions ... write me :o)
Please take note on how I bake and cook...
Here are other related Gluten-free desserts that may be of interest:
. 1 cup (142g) sweet Sorghum white flour
. 3/4 cup (165g) granulated sugar
. 1 Tbsp. (15ml) ground cinnamon spice
. 1 tsp. (5ml) baking powder {GF}
. 1 tsp. (5ml) baking soda
. pinch of salt
. 1/2 cup (60g) raw pecans, coarsely chopped
. 1/4 cup (40g) raisins (or dried cranberries)
. 2 big apples (type McIntosh, Pink Lady etc.)
.1/2 cup (125ml) vegetable oil (grape seed preferred)
. 2 large eggs
PREPARATION:
Use a large, rounded 10 x 2 in. (26 x 5cm) shallow, oven-proof dish or other cake pan.
Pre-heat at 350F/180C/Gas4. . Position the rack in the center of the oven.1. Lightly oil the cake dish or pan and set aside.
2. In a large bowl, place all dry ingredients. Whisk a few times to combine.
3. At this point, the apples can be peeled, cored and chopped into medium pieces. With a big spatula, toss the apples into the dry mix. Make sure they are well coated before proceeding.
4. Pour the oil and eggs over the above mix. Again with the spatula, toss and combine until no traces of flour are seen. Do not over mix...about 30 seconds is enough.
5. Pour the batter into the oiled dish and place it into the oven.
6. Bake for about 45-50 minutes in a light colored baking pan or 40-45 minutes in a darker one.
. This cake is best enjoyed at room temperature. Do not leave it out for more than two days. Big slices of cake freeze very well. If not, refrigerate the rest for no more than a week. The cake can later be lightly warmed up on very low heat for a few minutes before serving. A sprinkle of (optional) confectioners' powder can be added.

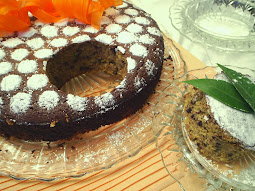
Ricotta Orange Chocolate torta cake ... Serves 6-8
Inspired by a cake Hubby and I had in a 'Pensione' in Sardinia, Italy. This recipe was re-created from just a few memorable bites.
Inspired by a cake Hubby and I had in a 'Pensione' in Sardinia, Italy. This recipe was re-created from just a few memorable bites.
INGREDIENTS:
(American / Metric measures)
. 1-1/4 cup (300g) fresh Ricotta cheese
. 1 cup (220g) granulated sugar
. 2 cups (285g) sweet Sorghum white flour
. 1 Tbsp. (15ml) baking powder {GF}
. 1 cup (220g) granulated sugar
. 2 cups (285g) sweet Sorghum white flour
. 1 Tbsp. (15ml) baking powder {GF}
. 2 tsp. (10ml) ground cinnamon spice
. pinch of salt
. 1/2 cup (90g) bittersweet(65%) chocolate pastilles*
. 3 large eggs
. 3 Tbsps. (45ml) frozen orange concentrate, thawed
. 1 Tbsp. (15ml) apple cider vinegar (optional)
. pinch of salt
. 1/2 cup (90g) bittersweet(65%) chocolate pastilles*
. 3 large eggs
. 3 Tbsps. (45ml) frozen orange concentrate, thawed
. 1 Tbsp. (15ml) apple cider vinegar (optional)
PREPARATION:
Use a 9 inch (22-23cm) spring form cake pan
Pre-heat the oven at 350F/180C/Gas4. Position the rack in the center of the oven.
1. Lightly oil the spring form cake pan and set aside.
2. In a medium bowl, prepare the dry (sifted-preferable) ingredients except the chocolate pastilles. Set aside.
3. In another large bowl, beat the ricotta and the sugar with an electric beater until smooth and creamy.
4. Add the eggs (one at the time) while beating. Add the orange concentrate and the apple cider vinegar.
5. Gradually add the flour mix into the batter while fully combining and being careful not to over beat.
6. With a spatula, fold in the chocolate pastilles. Pour the batter into the cake pan. With a spatula, lightly spread the batter and tap the pan down a few times to liberate bubbles.
7. Bake for 40-45 minutes in a light colored baking pan or 35-40 minutes in a darker one. Remove from the oven and let the pan rest on a rack for about 15 more minutes before passing a spatula around the perimeter and unclipping the pan's clasp.
. This cake is best enjoyed at room temperature. Do not leave it out for more than four days. Big slices of cake freeze very well. If not, refrigerate the rest for no more than a week. The cake can later be lightly warmed up on very low heat for a few minutes before serving.

Port Fig Yogurt spice torte cake ... Serves 8-10
Inspired by emptying out the refrigerator before my big home move ;o)
The bonus is that there’s no electric mixer required either.
The bonus is that there’s no electric mixer required either.
Click HERE for PRINTER version
INGREDIENTS:
(American / Metric measures)
. 2 cups (285g) sweet Sorghum white flour
. 2 tsps. (10ml) baking powder {GF}
. 1/4 tsp. (1ml) salt
. 2 tsp. (10ml) ground cardamom spice
. 4 large eggs
. 1/2 cup (110g) granulated sugar
. 1/2 cup (100g) brown sugar, packed
. 1/2 cup (125ml) plain (2% plus) yogurt
. 1/2 cup (125ml) mild olive oil
. 1 Tbsp. (15ml) vanilla extract
. 10 macerated Port figs*, sliced
* Note: If macerated Port figs are not part of your ingredients, an alternative could be to soak dried figs in Port of other chosen liquor for at least 2 hours ahead of making the cake. Just make sure they are properly strained of their liquid.
PREPARATION:
Use a large, rounded 10 x 2 in. (26 x 5cm) shallow, oven-proof dish or other cake pan.
Pre-heat at 350F/180C/Gas4
Position oven rack on the second level from the bottom.
1. In a medium bowl, put together the flour, baking powder, spice and salt. Set aside.
2. In another large bowl, whisk the eggs briskly. Add both sugars and whisk until dissolved.
2. In another large bowl, whisk the eggs briskly. Add both sugars and whisk until dissolved.
3. Add the yogurt, the oil, as well as the vanilla extract and keep whisking to combine.
4. At this point, add the flour mix gradually (preferably through a sieve) and whisk in until it's completely combined. Do not over-mix. Set aside while preparing the fig slices.
5. Afterwards, pour the batter into an oiled cake dish. Decoratively and lightly place the fig slices throughout the surface. This will keep them above the batter as the cake bakes. Otherwise the figs would sink and not be as visible.
6. Bake for 50-55 minutes in a light colored baking pan or 45-50 minutes in a darker one.
. This cake is best enjoyed at room temperature. Do not leave it out for more than four days. Big slices of cake freeze very well. If not, refrigerate the rest for no more than a week. The cake can later be lightly warmed up on very low heat for a few minutes before serving.

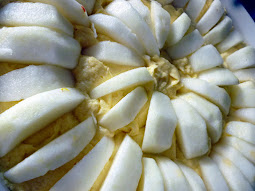
PLUM buttermilk torte cake ... Serves 8-10
Inspired by the generous plum pickings off my friend's bountiful fruit tree.
The essence of lemon and almonds were brought in through premium extracts.
The bonus is that there’s no electric mixer required either.
The bonus is that there’s no electric mixer required either.
Click HERE for PRINTER version
INGREDIENTS:
(American / Metric measures)
. 2 cups (285g) sweet Sorghum white flour
. 2 tsps. (10ml) baking powder {GF}
. 1/4 tsp. (1ml) salt
. 4 large eggs
. 1/2 cup (105g) granulated sugar
. 1/2 cup (100g) brown sugar, packed
. 1/2 cup (125ml) buttermilk*
. 1/2 cup (125ml) vegetable oil (grape seed preferred)
. 1 Tbsp. (15ml) lemon extract
. 1 Tbsp. (15ml) almond extract
. 28 small plums, halved and thickly sliced
* Homemade buttermilk:
For about every 1 cup (250ml) needed...first add 1 tbsp. (15ml) of EITHER white vinegar, cider vinegar or lemon juice. To that, now add the rest in the amount of milk to complete the volume required in the recipe. Let the milk rest for 10 minutes so that it thickens. Afterwards, give it a light stir before pouring into the recipe.
PREPARATION:
Use a large, rounded 10 x 2 in. (26 x 5cm) shallow, oven-proof dish or other cake pan.
Pre-heat at 350F/180C/Gas4
Position oven rack on the second level from the bottom.
1. In a medium bowl, put together the flour, baking powder and salt. Set aside.
2. In another large bowl, whisk the eggs briskly. Add both sugars and whisk until dissolved.
2. In another large bowl, whisk the eggs briskly. Add both sugars and whisk until dissolved.
3. Add the buttermilk, the oil, as well as both lemon and almond extracts. Continue whisking to combine.
4. At this point, add the flour mix gradually (preferably through a sieve) and whisk in until it's completely combined. Do not over-mix. Set aside while preparing the plum slices.
5. Afterwards, pour half the batter into an oiled cake pan. Sparingly and lightly place half the amount of plum slices. Pour the rest of the batter and repeat for the remaining plum slices throughout the surface. This will keep them above the batter as the cake bakes. Otherwise the plums would sink and not be as decoratively visible.
6. Bake for 50-55 minutes in a light colored baking pan or 45-50 minutes in a darker one.
. This cake is best enjoyed at room temperature. Do not leave it out for more than two days. Big slices of cake freeze very well. If not, refrigerate the rest for no more than a week. The cake can later be lightly warmed up on very low heat for a few minutes before serving.

Although, not celiac, I’ve realized how liberating it’s been on...
my digestive system and overall health.
Freeing baked goods of undesired gluten has proven to...
release me from preventable tummy discomforts.
release me from preventable tummy discomforts.
If you haven’t already...please do try to make an effort to go free of gluten.
By preparing one of these cakes, the outcome will certainly...
compliment your already established dessert repertoire.
Who knows...you may just be tempted to experiment as much as I have ;o)
compliment your already established dessert repertoire.
Who knows...you may just be tempted to experiment as much as I have ;o)
Until our next time together...
ciao for now and flavourful wishes,
ciao for now and flavourful wishes,
Foodessa
Comments or suggestions ... write me :o)
Claudia at: foodessa [at] gmail [dot] com
Go HERE for more SWEET creations.
Please take note on how I bake and cook...
Here’s a 101 of sorts to make sure that there are no disappointments when trying my creations.
Also...just so you know...feel free to increase the salt and sweet factor since I'm not high on either of them ;o)
. Use DRY cup measurements for...you guessed it...all DRY ingredients.
Anything DRY gets measured by spooning the overfilled ingredient (never shake the cup) and then level off with a flat edged tool. Exception...Brown sugar should be packed in and leveled.
. Use LIQUID cup measurements for...all LIQUIDS that cannot be leveled like for example butter, yogurt...etc. Measure the liquids at eye level to avoid overdoing what the recipe truly needs.
. OVENS are unfortunately not created equal. Mine is so old that it has reached many degrees off it's norm. It's really worth investing a few dollars to test yours with an appropriate oven thermometer. You'd be surprised how many ovens I've heard about not being where they should have been. Before you lose any more ingredients and much time preparing a new recipe...run to the store...you'll thank me later.
Here are other related Gluten-free desserts that may be of interest:


.JPG)